If this is your first time using the CSV upload option, then database backup is strictly recommended before you perform the CSV upload operation.
The CSV Upload feature in Product Manager PRO allows OpenCart store owners to easily update product data or add new products via CSV file. This functionality enables bulk product management, saving time and simplifying the process of updating product details. It is essential to use the correct CSV file format to ensure smooth data import and integration into your OpenCart store.
Key Features
1. Bulk Product Updates & Additions
- The CSV Upload option lets you update existing product data or add new products in bulk. Simply make the necessary changes in your exported CSV file, then re-upload it to your store for easy updates.
2. Correct File Format Requirement
- To ensure the upload works correctly, you must use the exact CSV file format that you export from the system. Changing the column positions or adding extra columns can lead to errors during the upload process.
- Download Exported CSV: Always begin by downloading the CSV file using the Export option. This ensures that the file format is correct for uploading and updating data.
3. Data Mapping & Table Matching
- Make sure the column position is unchanged and also no new columns are added to the CSV file.
How to Upload CSV File

- Download Exported CSV File:
- First, export the product data to a CSV file using the Export button. This is the file format that the system accepts for re-uploading.
- Make Changes to the CSV File:
- Open the CSV file in Excel or any compatible spreadsheet software and make your necessary changes (either updates to existing product data or additions of new products).
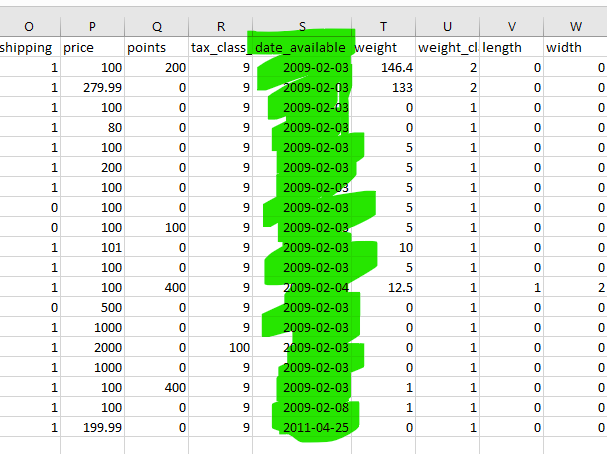
- Ensure Correct Date Format:
- When opening the CSV file in Excel, some columns (like dates) may be automatically formatted by Excel.
- Important: Ensure that date columns are in the correct format before uploading (e.g.,
YYYY-MM-DD HH:MM:SSorYYYY-MM-DD). Excel often formats dates asDD-MM-YYYY, which will cause issues when importing back into OpenCart.
- Import the CSV File:
- After making the changes, go back to the Product Manager PRO interface.
- Click the Import button.
- Select the relevant table (e.g., Products, Categories) and choose the updated CSV file.
- Click Import to upload the changes to your OpenCart store.
- Verify Data Import:
- After importing, verify that the data has been correctly updated or added in the OpenCart admin panel.

Notes and Best Practices
- CSV Format Integrity: Ensure the CSV file format remains unchanged from the export file. Altering columns or their positions will result in incorrect imports.
- Date Formatting: Pay special attention to the date format, as Excel may automatically change it to
DD-MM-YYYY, which is incompatible with OpenCart’s required date format (YYYY-MM-DD). - Backup: It’s always a good idea to create a backup of your existing product data before performing bulk updates using the CSV import.

Benefits
- Bulk Product Management: Efficiently manage and update product data in bulk using a CSV file.
- Save Time: Avoid manual updates by leveraging the CSV upload to make large-scale changes or additions quickly.
- Data Integrity: By using the exported CSV file format, you ensure that the uploaded data matches the required format and integrates seamlessly into your store.
- Flexible Updates: Make both minor edits and large-scale product additions in one go, streamlining the update process.
Changing the date format in MS EXCEL
Select the column and click on the dropdown highlighted in the image below

Select “More Number Formats”

Choose custom and enter format like yyyy-mm-dd or yyyy-mm-dd hh:mm:ss

Click the OK button.
After making the appropriate format and saving the file, you are all set to upload the CSV file.
FAQ
What happens if the date column is not formatted properly?
This will add the dates in the database as 0000-00-00.
I missed correcting the date format before uploading, can I format the date and upload the correct format again?
Yes, you can upload it again. The upload process basically deletes the previous rows with reference to product id and adds them as new rows in the database.
The CSV Upload feature is an invaluable tool for OpenCart store owners, especially those with large product catalogs, making it easy to manage and update products in bulk while ensuring accuracy and consistency in your store’s product data.